Most office desks have both a computer and an IP phone sitting side by side. Both devices use standard Ethernet and UTP cables, which immediately raises a practical question — how do you connect them to the network without wasting ports or running extra cable?
The Problem with Two Cables
The obvious approach is to run a separate cable from the switch to each device. This works, but it creates two problems. First, you need additional physical cabling — someone has to run a second cable from the wiring closet to every desk. Second, each device consumes a dedicated switchport, which gets expensive as your network grows.
There’s a better way.
The Built-In Switch Inside IP Phones
Most modern IP phones — including Cisco models — contain a small three-port switch inside the device. One port connects upstream to the network switch. One port connects the computer. The third port is internal, used by the phone itself.
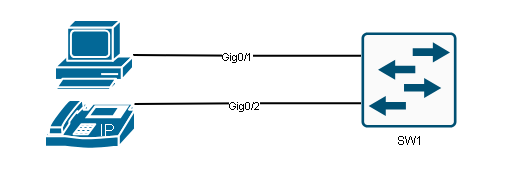
This internal switch allows a single cable run from the wall to the IP phone, and from the phone a second short cable connects to the computer. The topology looks like this:

You save a cable run and a switchport, but now both voice and data traffic share the same physical uplink between the phone and the switch.
Why You Need to Separate Voice and Data Traffic
Leaving voice and data on the same VLAN creates problems. Voice traffic is extremely sensitive to delay and jitter, while data traffic can tolerate some inconsistency. If a large file transfer competes with an active phone call on the same VLAN, call quality degrades quickly.
The solution is to place the computer in a data VLAN and the IP phone in a separate voice VLAN. Engineers also call the Voice VLAN the Auxiliary VLAN (AUX VLAN). This gives you the flexibility to apply different Quality of Service (QoS) policies to each traffic type and keep broadcast domains smaller.
The port connecting the IP phone to the switch actually behaves like a mini-trunk behind the scenes. Traffic from the computer passes through the phone and arrives at the switch untagged, where it belongs to the access VLAN. Traffic generated by the phone itself arrives tagged with the voice VLAN ID. This link allows only those two VLANs. If you’re already familiar with how 802.1Q tagging works, this makes perfect sense — if not, it’s worth reviewing.
Configuration
Configuring a voice VLAN on a Cisco switch is straightforward once you understand the logic. You need two VLANs: one for data traffic from the computer, and one for voice traffic from the phone. In this example, VLAN 100 carries computer data and VLAN 101 carries VoIP traffic.
Step 1 — Create the VLANs:
SW1(config)#vlan 100
SW1(config-vlan)#name COMPUTER
SW1(config-vlan)#exit

SW1(config)#vlan 101
SW1(config-vlan)#name VOIP
SW1(config-vlan)#exit
This creates both VLANs in the VLAN database and gives them descriptive names, which helps when you’re troubleshooting later. If you run VTP in your environment, it will automatically distribute those VLANs across multiple switches.
Step 2 — Configure the switchport:
SW1(config)#interface GigabitEthernet 0/1
SW1(config-if)#switchport mode access
SW1(config-if)#switchport access vlan 100
SW1(config-if)#switchport voice vlan 101
SW1(config-if)#exit
Let’s walk through each line.
switchport mode access sets the port as an access port. This handles the untagged traffic from the computer.
switchport access vlan 100 assigns VLAN 100 to the untagged frames — in this case, anything originating from the PC.
switchport voice vlan 101 is the key command. It tells the switch to accept tagged frames carrying VLAN 101 on this same port and treat them as voice traffic. The combination of access and voice VLAN commands is what creates that mini-trunk behavior on a port that is otherwise configured as an access port.
One thing worth understanding: even though switchport mode access is configured, this port actually behaves as a special hybrid port. It’s not a full trunk — it doesn’t negotiate trunking like DTP would — but it does carry two VLANs simultaneously.
How does the IP phone know which VLANs to use?
The switch doesn’t automatically push this information to the phone. Cisco IP phones use CDP (Cisco Discovery Protocol) to learn the voice VLAN ID from the switch. Once the phone boots up and receives CDP advertisements, it configures itself to tag voice traffic with VLAN 101. Non-Cisco phones typically use LLDP (Link Layer Discovery Protocol) for the same purpose. Either way, the phone learns dynamically — you don’t need to configure the VLAN manually on the phone itself.
Verification
After configuration, use show interfaces switchport to confirm everything is set correctly:
SW1#show interfaces GigabitEthernet 0/1 switchport
Name: Gi0/1
Switchport: Enabled
Administrative Mode: static access
Operational Mode: static access
Administrative Trunking Encapsulation: negotiate
Operational Trunking Encapsulation: native
Negotiation of Trunking: Off
Access Mode VLAN: 100 (COMPUTER)
Trunking Native Mode VLAN: 1 (default)
Administrative Native VLAN tagging: enabled
Voice VLAN: 101 (VOIP)
Administrative private-vlan host-association: none
...
Trunking VLANs Enabled: ALL
Pruning VLANs Enabled: 2-1001
Capture Mode Disabled
Capture VLANs Allowed: ALL
Protected: false
Unknown unicast blocked: disabled
Unknown multicast blocked: disabled
Appliance trust: none
The key lines to focus on are:
Administrative Mode: static access —confirms the switch treats this port as an access port, not a trunk. This is expected behavior even with voice VLAN configured.
Access Mode VLAN: 100 (COMPUTER) — confirms untagged traffic from the PC goes into VLAN 100.
Voice VLAN: 101 (VOIP) — confirms the phone’s tagged traffic will be placed in VLAN 101.
Negotiation of Trunking: Off — the port is not using DTP to negotiate trunking with the connected device.
Notice that the VLAN names appear next to the VLAN numbers. That’s another reason to name your VLANs when you create them — it makes verification output much easier to read at a glance.
If you want to verify the VLANs themselves are properly created and active, show vlan brief will list all VLANs and the ports assigned to them. Trunk port configuration between switches is a separate concern — if you’re carrying these VLANs across inter-switch links, those trunk ports need to permit VLAN 100 and 101 as well (Internal link suggestion: “Configure trunk ports on cisco switches”).
Summary
Voice VLAN solves a real physical and logical problem in enterprise networks. By leveraging the three-port switch inside IP phones, you eliminate the need for separate cable runs and switchports while still keeping voice and data traffic isolated at the VLAN level.
The switch port uses a combination of switchport access vlan for untagged computer traffic and switchport voice vlan for tagged phone traffic. The phone learns its VLAN assignment through CDP or LLDP. From the switch’s perspective, untagged frames land in the data VLAN and tagged frames carrying the voice VLAN ID are handled separately — enabling QoS policies to prioritize call traffic over regular data flows.
For the CCNA exam, make sure you understand that a port configured with both commands is neither a pure access port nor a full trunk port — it’s a hybrid that handles exactly two VLANs in different ways. That distinction frequently appears on exam questions.