When I first started working with networks, everything felt fragmented and confusing. Different vendors had their own ways of doing things—proprietary protocols, incompatible hardware, and no real standard way for equipment from one company to talk to another. I spent countless late nights trying to get a simple connection working between mismatched gear, only to realize the root problem was that no one was speaking the same language. That frustration is what made the OSI model such a game-changer for me when I finally studied it seriously during my CCNA preparation.
The OSI (Open Systems Interconnection) model, created by the ISO in the late 1970s, gave the industry a universal blueprint. It wasn’t just about making devices interoperable; it became the single best framework for learning, teaching, and especially troubleshooting networks. Even now, years after passing the exam and working on production environments daily, I still mentally walk through the seven layers whenever something goes wrong. It’s like a diagnostic checklist that never fails.
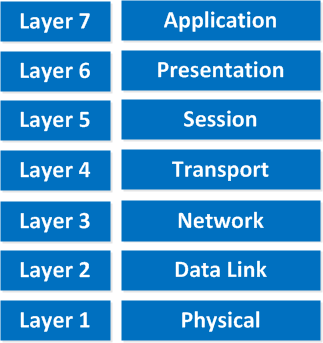
To help you remember the layers, I rely on two mnemonics that have stuck with me since my early study days. Going from bottom to top (Layer 1 to Layer 7): All People Seem To Need Data Processing. Going from top to bottom (Layer 7 to Layer 1): Please Do Not Throw Sausage Pizza Away. Pick whichever one clicks for you—they both work.
Here’s how I break down each layer, with real examples from my own experience and the kinds of things you’ll see on the CCNA exam.
Physical Layer (Layer 1)
This is the foundation—literally the cables, connectors, voltages, and signals. Everything starts here: bits being sent as electrical pulses, light flashes, or radio waves.
I’ve lost count of how many “network is down” tickets turned out to be a damaged patch cable, a bent pin in an RJ45 connector, or a transceiver that failed. One time I spent hours chasing intermittent connectivity only to discover someone had used a Cat5 cable for a 1 Gbps link—classic Physical Layer limitation.
Know your media types (twisted pair, fiber, wireless), signaling, and basic hardware like hubs and repeaters. If Layer 1 isn’t solid, nothing above it can function.
Data Link Layer (Layer 2)
Here we move from raw bits to organized frames. This layer handles communication between devices on the same local segment using MAC addresses.
Switches live here, building CAM tables to forward frames intelligently. Ethernet is the most common protocol you’ll see. I remember early in my career dealing with constant broadcast storms because someone created a loop—Spanning Tree Protocol (STP) saved the day, and that’s pure Layer 2.
ARP (mapping IP to MAC) also happens here. When troubleshooting slow LAN performance or devices that can’t ping each other on the same subnet, I always start looking at Layer 2 first.
Network Layer (Layer 3)
This is where routing happens and logical addressing (IP addresses) comes into play.
IP (IPv4 or IPv6), ICMP, and routing protocols (RIP, OSPF, EIGRP, BGP) operate at this layer. Routers make decisions based on destination IP addresses. Subnetting, which trips up so many CCNA candidates, is fundamentally a Layer 3 concept.
I’ve used this layer daily to diagnose why traffic wasn’t reaching a remote site—usually a missing route, wrong subnet mask, or ACL blocking traffic. Without a functioning Network Layer, devices on different networks can’t communicate, no matter how perfect the cabling or switching is.
Transport Layer (Layer 4)
Now we get to end-to-end communication. This layer segments data and provides reliability (or not).
TCP is connection-oriented, reliable, with sequencing, acknowledgments, flow control, and congestion avoidance. UDP is connectionless, fast, no guarantees—perfect for DNS, VoIP, video streaming. Ports are defined here (80 for HTTP, 443 for HTTPS, etc.).
I configure firewalls and NAT rules at this layer constantly. One memorable troubleshooting case involved random packet drops during file transfers; it turned out to be TCP window scaling issues on a high-latency link. Understanding the TCP three-way handshake and UDP’s simplicity is crucial for both the exam and real networks.
Session Layer (Layer 5)
This layer manages sessions—establishing, maintaining, and terminating connections between applications.
It handles dialog control and synchronization points (checkpoints for recovery). In practice, many functions are implemented inside application protocols, but you still need to know it exists.
I once debugged a database replication issue where sessions were dropping prematurely due to aggressive timeout settings—classic Session Layer behavior.
Presentation Layer (Layer 6)
The translator of the stack. It deals with data formatting, encryption, compression, and character encoding.
Think converting between ASCII and EBCDIC, JPEG compression, or SSL/TLS encryption (though TLS often straddles Layers 5–7). Early in my career I dealt with legacy systems that used different character sets, and mismatches caused garbled data.
Today it’s mostly transparent, but you still see it in things like SSL certificate errors or format incompatibilities.
Application Layer (Layer 7)
This is where the user interacts with the network—HTTP, FTP, SMTP, DNS, SNMP, and more.
The browser, email client, or any application generates the actual data here.
Common Protocols and Examples at Layer 7
When someone says “the internet is slow,” I often start at Layer 7: is DNS resolving? Is the HTTP request malformed? Proxy issues?
Many modern troubleshooting tools (load balancers, WAFs, API gateways) operate at this layer.
Why Layer 7 Matters in Troubleshooting
Upper layers like this are vital, but remember: solid lower layers enable them. In my experience, Application Layer issues often show up as user complaints rather than obvious network failures.
You can’t skip layers. Data is encapsulated as it moves down the stack and de-encapsulated as it moves up. Trying to jump layers breaks the whole modular design.
Real-Life Data Flow: Browsing a Website
Here’s what happens when you browse a website (non-HTTPS for simplicity):
- You type a URL → Application Layer generates the HTTP request.
- Presentation Layer handles any needed encoding.
- Session Layer sets up the session.
- Transport Layer breaks the data into TCP segments, adds source/destination ports.
- Network Layer wraps segments into IP packets with source/destination IP addresses.
- Data Link Layer encapsulates packets into frames with MAC addresses.
- Physical Layer converts frames to bits and sends them over the wire.
At the destination, the process reverses.
The Postal Service Analogy for Encapsulation
A great analogy I use when teaching is the postal service. Your letter (Application data) gets put into an envelope with delivery instructions (Transport segment), then placed in a larger package with a shipping label (Network packet), then loaded into a truck with destination codes (Data Link frame), and finally driven over roads (Physical bits). At the other end, everything is unpacked in reverse order.
PDU Names You Must Know
PDU names matter:
- Transport → segment (TCP) or datagram (UDP)
- Network → packet
- Data Link → frame
- Physical → bits
Mix these up on the exam and you’ll lose easy points.
OSI Model in Action: Hands-On with Wireshark
To really see the model come alive, use Wireshark. Here’s my go-to quick demo:
- Download and install Wireshark.
- Open it, select your active interface, and start capturing.
- Apply a capture filter like host example.com or a display filter like http.host == “example.com”.
- In a browser, visit http://example.com (non-HTTPS so you see clear text).
- Stop the capture, find an HTTP packet, and expand the layers.
You’ll see the Ethernet II frame (Layer 2), inside it the IPv4 packet (Layer 3), inside that the TCP segment (Layer 4), and finally the HTTP request (Layer 7). It’s one of the best “aha” moments for students.
The OSI model isn’t just something to memorize for the CCNA—it’s a mental framework I use every day to isolate problems quickly. Start at Layer 1 and work up until you find where things break. Most issues I see are in Layers 1–4 because that’s where the physical movement and routing happen.
If you’re studying for CCNA, focus on understanding (not just memorizing) the layers, practice subnetting at Layer 3, master TCP vs UDP at Layer 4, and get comfortable with Wireshark. It will make both the exam and your first real network job much less stressful.
Feel free to ask any questions in the comments—whether it’s about a specific layer, encapsulation, or how to use the model in troubleshooting. I’m happy to help.